

To perform a compression test on a classic-car engine, warm the engine when it is safe to run, disable the ignition and fuel systems, remove all spark plugs, hold the throttle fully open, and install a compression gauge in one cylinder at a time.
Crank the engine consistently until the gauge stops rising, record the reading, and repeat the process for every cylinder.
A compression test identifies differences in cylinder sealing involving the piston rings, valves, pistons, or head gasket.
It does not evaluate the engine’s bearings, oil pressure, cooling system, or complete mechanical condition.
What Does a Compression Test Measure?
A compression test measures the peak pressure created inside each cylinder while the engine is cranking.
The reading is influenced by:
- Piston-ring and cylinder-wall sealing
- Intake and exhaust valve sealing
- Head-gasket condition
- Compression ratio
- Camshaft and valve timing
- Cranking speed
- Throttle position
- Engine temperature
- Gauge accuracy
Low or uneven readings identify cylinders that require further investigation. They do not determine the exact failed component by themselves.
Why Compression Testing Is Useful on Classic Cars
Classic vehicles often have unknown maintenance histories, previous engine modifications, or long periods of storage. Compression testing can help investigate:
- Rough idle or persistent misfires
- Hard starting
- Loss of power
- Excessive oil consumption
- Blue exhaust smoke
- Suspected valve or piston-ring wear
- Possible head-gasket failure
- Engine condition before purchasing a classic car
Older starters, batteries, cables, and electrical grounds can also reduce cranking speed and produce misleadingly low readings. Test conditions must remain consistent across every cylinder.
Before assuming that a misfire, hard starting, power loss, or smoke is caused by internal wear, follow a structured process to diagnose common classic-car engine problems and rule out ignition, fuel, cooling, and external mechanical causes.
Based on more than 14 years of classic-car restoration experience, our approach is to treat consistency as part of the test itself.
We record engine temperature, throttle position, cranking speed, stroke count, and individual cylinder readings so that differences are less likely to result from changing test conditions.
We then compare the pattern with other findings rather than recommending repairs from one PSI reading alone.
Testing an Engine That Has Been Sitting
Do not immediately start an engine that may be seized, lacks lubrication, contains contaminated oil, or has been stored for years without inspection.
Before cranking a long-stored engine:
- Confirm that the crankshaft rotates safely
- Check the oil and coolant condition
- Inspect for water, fuel, or coolant contamination
- Verify that the cylinders do not contain liquid
- Confirm that the battery cables and grounds are serviceable
A cold compression test can provide a preliminary baseline when warming the engine is unsafe. Cold readings should not be compared directly with specifications requiring a warm engine.
Low readings after storage may result from stuck piston rings, dry cylinder walls, slow cranking, or valve leakage. They do not automatically prove permanent cylinder wear.
Tools and Preparation
You will need:
- Threaded compression gauge with the correct adapter
- Spark-plug socket and ratchet
- Battery charger when necessary
- A method for recording each reading
- Vehicle or engine specifications, if available
- Wheel chocks and basic safety equipment
Before testing:
- Place the transmission in Park or Neutral
- Apply the parking brake and chock the wheels
- Verify the engine oil and coolant levels
- Charge the battery fully
- Warm the engine only if it can be operated safely
- Disable fuel delivery
- Disable the ignition according to the system’s design
- Label the spark-plug wires before removal
- Remove all spark plugs
- Arrange for the throttle to remain fully open during cranking.
Ignition systems vary. Follow the vehicle or ignition manufacturer’s procedure when disabling the system. Incorrect handling can damage ignition components or create a shock or fire hazard.
How to Perform the Compression Test
Step 1: Warm the engine when appropriate
A warm engine usually provides more representative readings because the pistons, rings, valves, and cylinder walls are closer to normal operating conditions.
Skip this step if running the engine could cause damage.
Step 2: Disable ignition and fuel
The engine must crank without starting. Disable both systems using a method appropriate for the vehicle.
Disabling fuel also helps prevent fuel from entering the cylinders and contaminating the oil during repeated cranking.
Step 3: Remove all spark plugs
Removing every spark plug allows the engine to crank more evenly and reduces the load on the starter.
Inspect and label the plugs as they are removed. Differences in color, deposits, oil fouling, or coolant cleaning may provide additional diagnostic clues.
Step 4: Hold the throttle fully open
A closed throttle restricts incoming air and can make all cylinders read artificially low.
If the engine uses a choke, verify that it is also open.
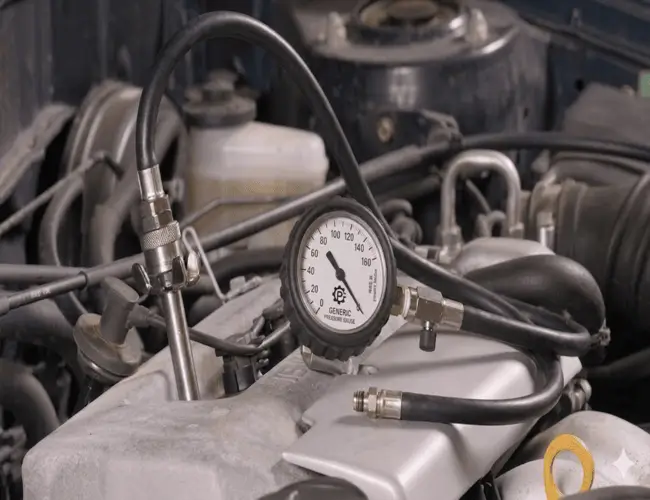
Step 5: Install the gauge
Thread the compression-gauge adapter into the first spark-plug hole by hand.
Do not force or cross-thread the adapter. The connection must seal properly without damaging the spark-plug threads.
Step 6: Crank the engine consistently
Crank the engine through the same number of compression strokes for every cylinder or until the gauge stops increasing.
Follow the gauge manufacturer’s instructions and record:
- Final peak pressure
- Number of compression strokes
- How quickly the pressure increased
A cylinder that builds pressure slowly may behave differently from one that reaches its peak immediately.
Step 7: Repeat for every cylinder
Release the gauge pressure and repeat the same procedure using identical test conditions.
Record the readings in cylinder firing or numerical order so low cylinders can be compared with their physical position in the engine.
What Are Good Compression Readings?
There is no universal healthy PSI range for every classic engine.
Readings vary according to:
- Engine design and compression ratio
- Camshaft profile and timing
- Cranking speed
- Engine temperature
- Altitude
- Previous modifications
- Gauge and adapter design
Use specifications for the exact engine whenever possible.
When specifications are unavailable, consistency between cylinders is generally more useful than applying a universal PSI range.
Many diagnostic references use approximately 10–15% variation as a general warning threshold, but the manufacturer’s specification should take priority.
Calculate the percentage difference with:
Variation = (Highest reading − Lowest reading) ÷ Highest reading × 100**
For example, if the highest cylinder measures 150 PSI and the lowest measures 125 PSI:
(150 − 125) ÷ 150 × 100 = 16.7%**
That difference warrants further investigation, but it does not identify the failed component.
Note: this is an estimated formula and example.
How to Interpret Compression Patterns
High and relatively consistent readings
This generally indicates that the cylinders seal consistently during cranking. It does not confirm that the bearings, lubrication system, cooling system, or entire engine are healthy.
Low but consistent readings
Possible causes include:
- Slow cranking speed
- Weak battery or poor cable connections
- Closed throttle or choke
- Cold testing
- Incorrect camshaft or valve timing
- Low-compression engine design
- High altitude
- General ring, valve, or cylinder wear
Verify the test conditions before assuming that the engine is worn out.
One cylinder is substantially lower
Possible causes include:
- Burned or leaking valve
- Incorrect valve adjustment
- Worn camshaft lobe
- Damaged piston
- Broken or worn piston rings
- Localized head-gasket failure
A wet compression test or leak-down test can help narrow the cause.
Two adjacent cylinders are low
Adjacent low cylinders may suggest a head-gasket leak between them, but this pattern is not conclusive.
Valve leakage, piston damage, or another localized sealing issue can produce similar results. Use leak-down and cooling-system testing to confirm the cause.
If adjacent low readings are accompanied by unexplained coolant loss, persistent white smoke, repeated overheating, or cooling-system pressure, review the signs of head-gasket failure in classic cars.
Unusually high readings
Possible causes include:
- Carbon accumulation
- Modified pistons or cylinder heads
- Increased compression ratio
- Camshaft differences
- Gauge variation
- Incorrect reference specifications
High pressure is not automatically proof of a problem, but an isolated unusually high cylinder should be investigated.
How to Perform a Wet Compression Test
A wet compression test can help determine whether a low reading may involve the piston rings or cylinder walls.
- Add only a small amount of clean engine oil to the low cylinder
- Reinstall the gauge
- Repeat the test under the same conditions
- Compare the dry and wet readings
Possible interpretations:
Meaningful increase: May indicate that the oil temporarily improved sealing around worn rings or cylinder walls.
Little or no change: May point toward valve leakage, incorrect valve adjustment, piston damage, or a head-gasket problem.
A wet test is suggestive, not conclusive. Excessive oil can distort the result and may create a hydraulic-lock risk.
Compression Test vs. Leak-Down Test
| Test | What it measures | Best use |
|---|---|---|
| Compression test | Peak pressure during cranking | Identifies and compares weak cylinders |
| Leak-down test | Amount and path of air leakage | Helps locate leakage through rings, valves, or the cooling system |
During a leak-down test:
- Air at the intake may indicate an intake-valve leak
- Air at the exhaust may indicate an exhaust-valve leakAir at the crankcase may indicate piston-ring or cylinder leakage
- Bubbles in the cooling system may indicate a gasket, cylinder-head, or block leak.
A leak-down test narrows the likely leakage path but may not identify the exact failed part without further inspection.
Common Compression-Testing Mistakes
Avoid:
- Testing with a weak battery
- Leaving the throttle or choke closed
- Removing only one spark plug
- Failing to disable fuel and ignition safely
- Comparing cold results with warm specifications
- Cross-threading the gauge adapter
- Ignoring altitude and engine design
- Assuming one low reading proves the engine needs rebuilding
If a result appears abnormal, verify the procedure and repeat the test before making a repair decision.
Frequently Asked Questions
Can a compression test damage a classic engine?
It is generally safe when the engine can rotate normally, the cylinders contain no liquid, and the fuel and ignition systems are disabled correctly. Do not crank an engine that may be seized or internally damaged.
Can compression testing be performed on a cold engine?
Yes, when warming the engine is unsafe or impossible. Treat the results as a preliminary baseline and do not compare them directly with specifications requiring a warm test.
What causes all cylinders to read low?
Possible causes include slow cranking, a weak battery, closed throttle, cold testing, incorrect valve timing, high altitude, a low-compression design, or widespread internal wear.
Should I compression-test a classic car before buying it?
Yes, when the seller permits it and the test can be performed safely. The results can reveal cylinder differences that may not be apparent during a brief road test.
When should a leak-down test be performed?
Use a leak-down test when compression readings are low or uneven and you need to determine whether pressure is escaping through the valves, piston rings, head gasket, or cooling system.
Get Help Interpreting Compression Results
Low compression does not automatically mean a classic-car engine needs rebuilding.
Results must be interpreted alongside cranking speed, test conditions, oil consumption, blow-by, engine noise, oil pressure, leak-down findings, and the engine’s specifications.
If your results indicate widespread internal wear, review the signs your classic-car engine may need rebuilding.
With more than 14 years of classic-car restoration experience, Coastline Classic Car Restorations in Huntington Beach uses compression testing as one part of a complete engine evaluation.
We compare cylinder patterns with the engine’s operating history and supporting test results before recommending targeted repair, further inspection, or rebuilding.
Request an inspection or learn more about our classic-car engine rebuilding and restoration services.