

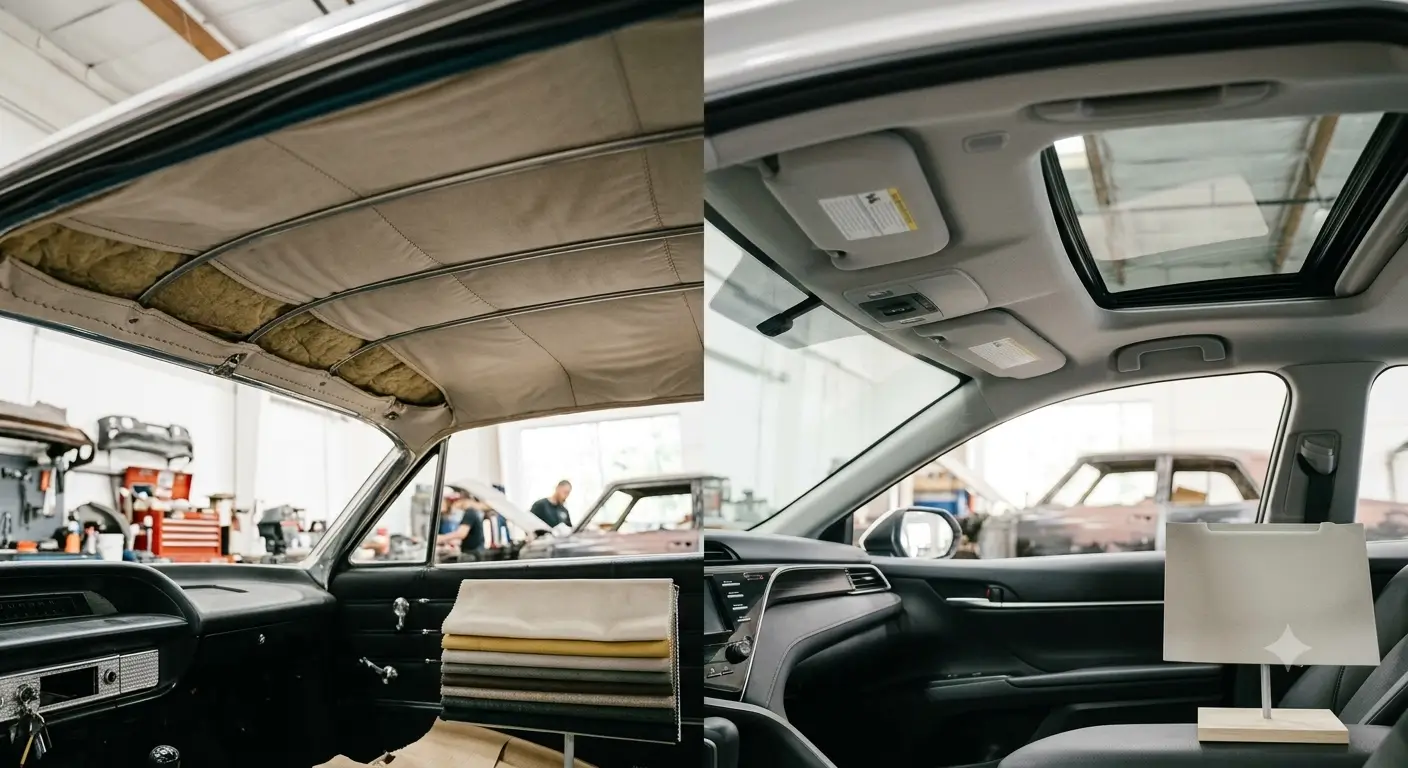
Bow-style headliners are suspended from metal or wood bows that span the roof. Board-style headliners use fabric or vinyl bonded to a rigid or semi-rigid backing panel.
The correct restoration method depends on the system originally designed for the vehicle. A bow-style headliner must be centered, aligned, and tensioned across its bows.
A board-style headliner normally requires removal of the panel, stripping failed fabric and foam, repairing the substrate, and bonding new material to a clean surface.
Bow-Style vs. Board-Style Headliners at a Glance
| Feature | Bow-Style Headliner | Board-Style Headliner |
|---|---|---|
| Main support | Curved bows spanning the roof | Molded or formed backing panel |
| Attachment | Sewn sleeves slide over bows; edges are tensioned and secured | Fabric or vinyl is bonded to the panel |
| Appearance | Several seams across the roof | Smooth, mostly uninterrupted surface |
| Common failure | Wrinkles, loose material, torn sleeves, missing or misplaced bows | Sagging fabric, failed foam, warped or cracked board |
| Correct repair | Restore the bow system and install a vehicle-specific sewn headliner | Remove the panel, clean and repair it, then apply new foam-backed material |
| Main challenge | Even tension and seam alignment | Smooth bonding without wrinkles or panel damage |
What Is a Bow-Style Headliner?
A bow-style headliner is a suspended roof liner supported by curved rods. The replacement material contains sewn sleeves, often called listings or listing pockets.
Each bow slides through its assigned sleeve and mounts to factory holes, clips, retainers, or brackets.
You probably have a bow-style headliner when:
- Several parallel seams run across the roof
- The material feels suspended when lightly pressed
- Open space can be felt between the headliner and roof
- The edges disappear behind windlace, garnish moldings, tack strips, or window seals
- Metal bows or their mounting points become visible when side trim is removed
Bow count, curvature, and position can vary by model year, body style, and roof configuration. Bows that look similar are not always interchangeable, so each one should be labeled during disassembly.
How Is a Bow-Style Headliner Restored?
1. Document the original installation
Before removal, photograph the bow order, seam positions, edge attachments, sail panels, trim, visors, dome light, mirror, and the amount of material wrapped around each edge.
Protected original material may help confirm color, grain, perforation, and stitching.
2. Remove the old material carefully
Visors, lights, handles, windlace, garnish moldings, and related trim are removed as needed. The headliner is released gradually so bow positions and factory attachment points are not lost.
Some vehicles retain the material beneath window seals, requiring coordinated glass removal.
3. Inspect the bows and roof structure
Check each bow for corrosion, distortion, missing end caps, damaged clips, or previous repairs. Inspect the exposed roof for leaks, rust, failed insulation, loose wiring, damaged tack strips, and missing retainers.
4. Position the new sewn headliner
The bows are inserted into their matching sleeves and returned to their original locations.
Before the edges are secured, the installer verifies the centerline, seam alignment, bow spacing, dome-light position, and material distribution.
5. Apply even tension
The material is worked gradually from the center outward and balanced from side to side.
Pulling one area too tightly can curve seams, create diagonal wrinkles, shift the centerline, distort perforations, or leave too little material at another edge.
Openings for lights, visors, mirrors, and hardware should be cut only after final alignment is confirmed.
What Is a Board-Style Headliner?
A board-style headliner uses a formed panel to create the roof-liner shape. The substrate may be fiberboard, composite, ABS plastic, or fiberglass. Foam-backed cloth or vinyl is bonded to its visible surface.
You probably have a headliner board when:
- The roof liner feels solid or semi-rigid
- The visible surface has few or no cross-roof seams
- Fabric sags as one broad section
- The roof shape remains above the hanging fabric
- Perimeter moldings and overhead components hold the assembly in place
- A formed panel appears after surrounding trim is removed
Why Do Board-Style Headliners Sag?

Most board-style headliners sag because the thin foam layer between the fabric and backing panel deteriorates.
As the foam ages, it turns to powder and separates from the substrate. Heat, humidity, leaks, age, and unsuitable adhesive can accelerate failure.
After restoration, reducing prolonged heat and ultraviolet exposure can also help protect classic car upholstery from sun damage and slow the deterioration of surrounding interior materials.
Spraying glue through the fabric is rarely a durable repair because the adhesive bonds to loose foam residue rather than a stable surface.
A lasting restoration requires removing the failed layers and preparing the board correctly.
How Is a Board-Style Headliner Restored?
1. Remove trim and overhead components
Visors, lights, mirror hardware, handles, pillar trim, windlace, and garnish moldings are removed as required. The board must be supported during removal because aged fiberboard can crack under its own weight.
2. Remove the panel through the correct opening
The board may exit through a door, hatch, windshield opening, or rear-glass opening. Forcing it through a small opening can crease or break it.
3. Strip the failed material and foam
The old covering is peeled away, and all loose foam and unstable adhesive residue are removed. Leaving deteriorated foam behind creates an uneven bonding surface and can cause the new material to sag again.
4. Repair or replace the substrate
Inspect the board for cracks, broken corners, enlarged mounting holes, warping, delamination, water damage, and adhesive buildup.
Local damage may be repairable; a severely damaged panel may require a vehicle-specific replacement.
5. Bond new material in controlled sections
Test-fit the covering for grain direction, stretch, perforation alignment, contours, and perimeter allowance. Apply automotive-grade headliner adhesive in manageable sections and follow its coverage, flash-time, temperature, ventilation, and curing instructions.
The material is worked gradually across the panel to avoid trapped air, wrinkles, excessive stretching, and thinning of the foam over deep contours.
6. Finish openings and reinstall
Edges and hardware openings are trimmed only after the visible surface is bonded correctly. The recovered board is supported during reinstallation, and fasteners are tightened without crushing the substrate or creating visible depressions.
Which Headliner System Is Better for a Classic Car?
Neither system is universally better. The right choice is usually the one originally designed for the vehicle.
A bow-style headliner preserves the seams, contour, and trim relationships found in many earlier interiors.
A board-style system is correct for vehicles designed around a molded panel and provides a smoother roof appearance.
For a concours or factory-correct restoration, changing systems may reduce authenticity. A molded-board conversion may suit some restomods, but only when a vehicle-specific panel fits the headroom, trim, lighting, visor, sail-panel, and insulation requirements.
Choosing the Correct Headliner Material
The correct material may be perforated vinyl, crush-grain vinyl, basketweave-style vinyl, cloth, mohair-style fabric, foam-backed headliner cloth, or model-specific sail-panel material.
Color is only one attribute. A period-correct match may also depend on grain, perforation size, sheen, seam spacing, backing, stretch direction, and stitching.
Similar considerations apply when deciding between leather, vinyl, and cloth for classic car upholstery elsewhere in the interior.
When original material remains, a protected sample from behind trim is usually a better reference than an exposed section that has faded or yellowed.
Common Headliner Restoration Mistakes
The most common errors are:
- Mixing up bows with different lengths or curves
- Cutting visor, light, or mirror openings before final alignment
- Pulling one side tighter and creating curved seams or diagonal wrinkles
- Applying new material over deteriorated foam
- Using general-purpose adhesive that cannot tolerate roof heat
- Ignoring water leaks, damaged seals, rust, or wet insulation
- Ordering parts by model name without confirming year, body style, bow count, roof configuration, and trim details
- Forcing a fragile headliner board through the wrong opening
Is Headliner Restoration a DIY Project?
An experienced owner may recover a simple, intact board. Bow-style systems, fragile panels, rare materials, brittle trim, missing bows, glass removal, and factory seam alignment are less forgiving.
Professional installation is especially valuable for judged vehicles, resale preparation, or complete interior restoration.
Owners coordinating a headliner with seats, panels, or other soft trim should also consider how long classic car upholstery restoration takes when planning the overall project.
Material availability, glass removal, substrate repairs, and the amount of custom fitting required can also influence the cost of classic car upholstery restoration.
Frequently Asked Questions
Does the glass need to be removed for headliner restoration?
Not always. Glass removal is only needed when the headliner is secured beneath the windshield or rear-window seals.
Can a sagging headliner be repaired without removing the board?
Usually not permanently. A lasting repair normally requires removing the board, stripping failed foam, and applying new material.
Can original headliner bows be reused?
Yes, if they are not severely rusted, bent, or damaged. Label each bow during removal because their positions may differ.
Should roof insulation be replaced with the headliner?
Inspect it while the headliner is removed. Replace insulation that is wet, deteriorated, contaminated, or incorrectly installed.
Classic Car Headliner Restoration in Huntington Beach
Coastline Classic Car Restorations repairs bow-style and board-style headliners for classic, vintage, collector, and restored vehicles in Huntington Beach and throughout Orange County.
Our process may include identifying the original roof-liner system, documenting bows and attachment points, repairing retainers or tack strips, restoring or replacing backing panels, selecting period-correct materials, addressing insulation and sound deadening, and completing a final fit inspection.
Whether your vehicle has sagging fabric, a damaged board, missing bows, loose seams, or an incomplete previous installation, the first step is a complete evaluation of the headliner and the structure behind it.
If the interior also has low, uneven, or unsupported seating, learn how sagging or collapsed classic car seats are properly repaired.
Explore our Classic Car Upholstery Restoration service in Huntington Beach about seats, door panels, carpet, insulation, headliners, and complete upholstery restoration.